Installing the PostMaster+ Fence
If you are looking for installation instructions for the Original PostMaster, please click here.
The below instructions are for a Traditional Solid Board Privacy Fence.
If you are looking for other styles such as Board on Board or Horizontal, please look in the Installation PDFs on the right.
NOTE: The information contained in these guidelines is intended to provide general guidance with basic PostMaster® fence installation. The installer must take proper safety precautions including gloves and eye protection. If you have any questions or doubts in regards to your fence installation, please consult with a licensed professional.
BEFORE YOU BEGIN
Ensure that fence footings do not exceed legally established property lines and set-backs.
If uncertain, refer to your real estate line plot or consult a professional surveyor.
Check local codes for specifications regarding frontage locations, allowable fence heights, etc.
A permit may be required.
Consult with local utility companies for locations of underground cables or pipelines.
Install Instructions:
PostMaster Plus:
Solid Board Fence
Shadowbox Style Fence
Board on Board Fence
Not sure you want to DIY?
Step 1: Plan, Layout, & Mark
Locate your property’s boundary lines. Precisely marking the fence layout is the critical first step in a quality installation.
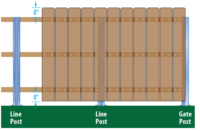
Stake the locations of each Corner Post and Gate Post.
Line Posts should be spaced the length of your rail + 2″, on center. The exact spacing may be modified depending on rails used, fence height and ground slope.
Place shorter sections at the corners or near gates or buildings to make the fence fit the length of the layout.

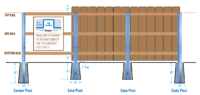
Step 2: Locate and Set Posts
Dig the post holes 6 – 10 in. diameter. Corner and Gate Posts should be 30 in. deep, while Line Posts can be 24 in. deep. The exact diameter and depth will be determined by local conditions.
The height of fence pickets should be 8 in. above the top of the top rail and 8 in. below the bottom of the bottom rail. Leave a 2 inch gap at the bottom between the pickets and the ground.
Center the terminal posts in the holes. Make sure the posts are plumb, square to the fence line and set to the correct height.
Block and support the post to preserve post position as installation continues.
Fill the hole with concrete in a continuous pour, mounding the top to direct water away from the post. When the concrete has hardened in the corner and gate posts, stretch a string between them to help set the line posts at the correct height.
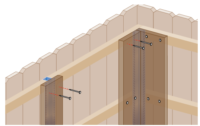
Step 3: Install Rails
Top rails are installed at the top of the post; bottom rails are attached 8″ above the board bottom and middle rails are centered between the top and bottom rails.
NOTE: If the ground slopes, be sure to cut both rail-ends diagonally to allow a flush fit against the post.

Step 4: Install Pickets
Typically pickets are positioned 2″ above ground level and extend 8″ above the top of the top rail.
Step 5: Install Cover Boards
Finish the installation by adding 1×6 cover boards over the PostMaster Plus posts.